Middle Ages and Renaissance Art Explained for Students
Compare middle ages and renaissance art with clear timelines, techniques, and study prompts to help students see themes, artists, and what changed.
Topics: middle ages and renaissance art, renaissance art techniques, medieval art themes, art history for students, renaissance artists
You might be looking at two old paintings for homework and thinking, “These both have halos, robes, and religious scenes. How am I supposed to tell which one is medieval and which one is Renaissance?” That confusion is normal. A lot of classroom explanations make the comparison sound too simple.
Students often get taught a shortcut like “Middle Ages art is flat, Renaissance art is realistic.” That's not completely wrong, but it leaves out the part that helps you understand the images. Some medieval art is more observant than people expect. Some Renaissance art is still religious. The better question is not just what looks different. It's why artists worked differently, who paid for the work, and what stayed the same.
This guide walks through middle ages and Renaissance art in a way you can use in class. You'll build the timeline first, then look at purpose, technique, major artists, and the evidence historians use today. If you like studying by questioning yourself instead of rereading, the same kind of step-by-step thinking also fits the learning approach described in Knobee's pedagogy overview.
Table of Contents
- Why Middle Ages and Renaissance Art Can Feel Confusing at First
- When Each Era Happened and How Historians Divide the Timeline
- What Art Was For and Who Decided What Got Made
- How Techniques Changed What Artists Could Show
- Major Artists and Works That Mark the Transition
- How We Know What We Know About These Artworks Today
- Study Prompts and Next Steps to Remember the Difference
Why Middle Ages and Renaissance Art Can Feel Confusing at First
A common classroom moment goes like this. Your teacher projects two paintings. Both show the Virgin Mary. Both have gold or rich color. Both were made in Europe. One is labeled medieval. One is labeled Renaissance. Half the class guesses wrong.
That happens because the eras overlap more than students expect. Religious images did not suddenly disappear when the Renaissance began. Churches still commissioned art. Devotional images still mattered. Patrons still wanted pictures that taught, inspired, and displayed status.
The textbook shortcut that only gets you halfway
The usual shortcut is “flat versus realistic.” That helps a little. Medieval art often puts more emphasis on symbolic meaning than on making figures look fully natural in space. Renaissance artists often cared more about anatomy, depth, proportion, and believable light.
But that shortcut breaks down fast.
- Religious continuity: Both eras made a lot of Christian art.
- Shared functions: Art in both periods could teach, guide devotion, and honor important people or institutions.
- Gradual change: Artists did not wake up one morning and stop painting in older ways.
Practical rule: If two artworks seem similar, don't ask only “Which looks more realistic?” Also ask, “Who was this for, and what job was it meant to do?”
A more useful way to compare them
Try using three lenses instead of one:
- Time: When was it made?
- Purpose: Was it for prayer, teaching, civic pride, or private display?
- Technique: What materials and visual tools helped create the effect?
This is the framework that clears up most confusion. Once you know the timeline, the patron, and the method, the artwork usually makes more sense.
Where students often get stuck
Students often assume that “Renaissance” means “nonreligious.” That's one of the biggest mistakes. The Renaissance did include more portraits, mythological scenes, and civic art, but religious art stayed central.
They also mix up “old-looking” with “medieval.” Some Renaissance works still look formal. Some late medieval works already show movement toward naturalism. The shift was real, but it was not a clean cut.
When Each Era Happened and How Historians Divide the Timeline
Before you compare styles, lock down the dates. If the timeline is fuzzy, every painting starts to blur together.
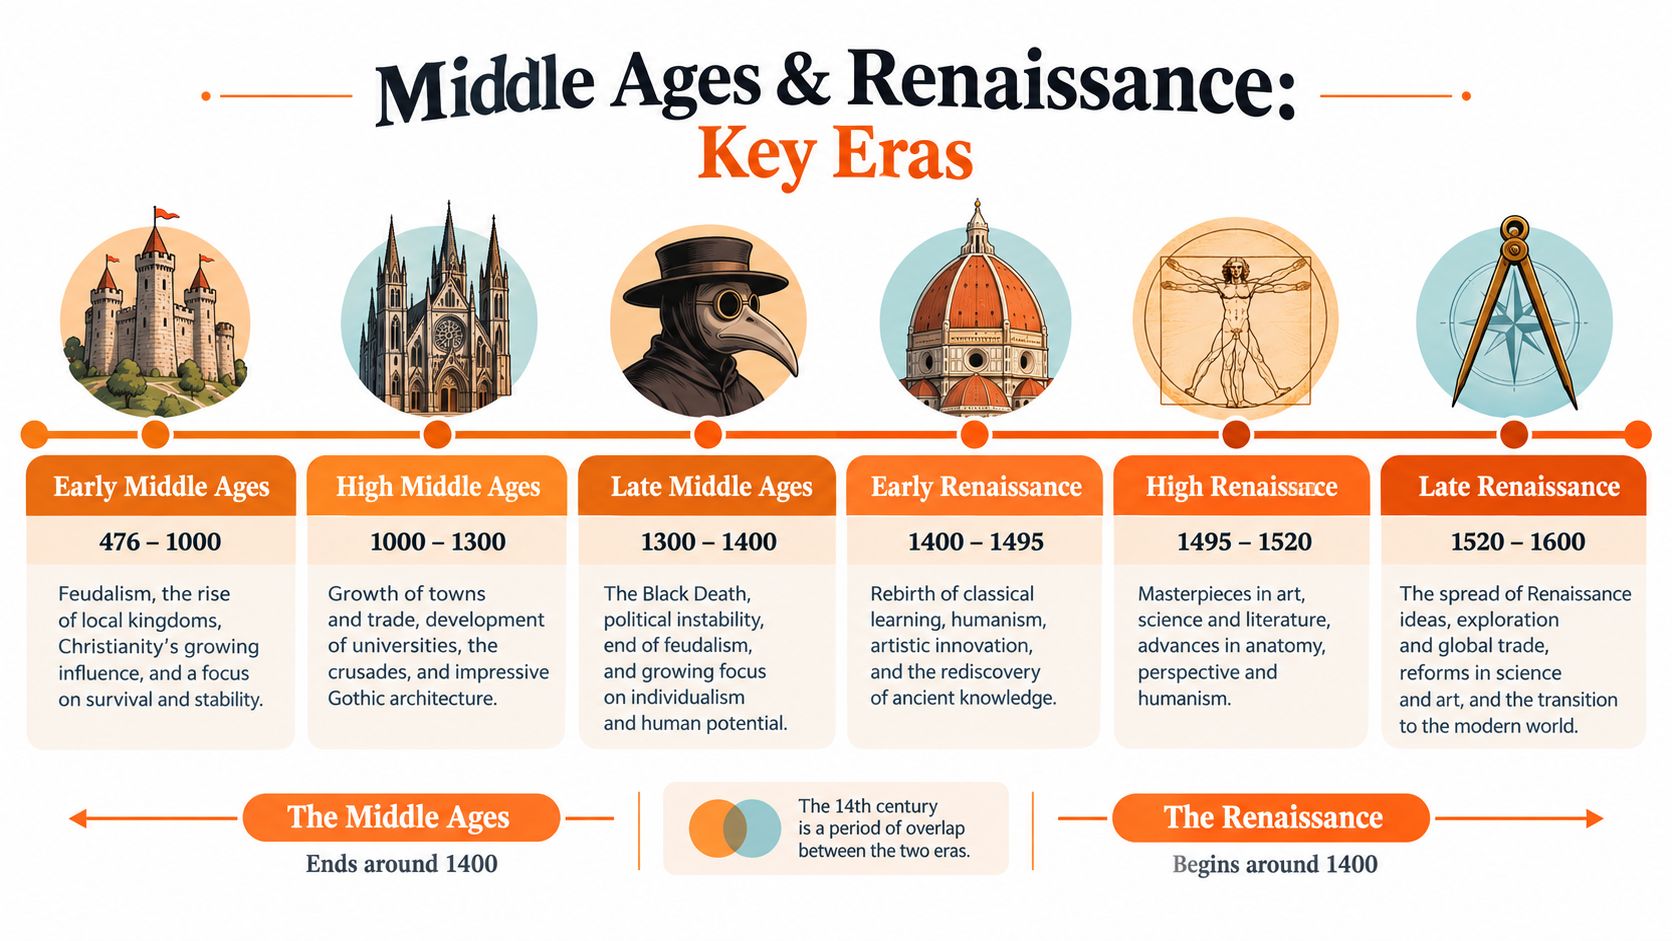
Historians commonly frame medieval Europe from the fall of Rome in 476 CE to the beginning of the 14th century, while the Renaissance in art history is often described as spanning roughly 1400 to 1600 CE, with some historians extending it to about 1650 depending on country and medium, as summarized in World History Encyclopedia's Renaissance art timeline.
The big timeline in plain language
The Middle Ages lasted many centuries. The Renaissance grew out of the later part of that world, like a long bridge, not a snapped stick. It did not erase it overnight.
A simple sequence looks like this:
- Middle Ages: From 476 CE through the early 14th century
- Renaissance begins: Commonly placed around 1400
- Renaissance extends: Roughly to 1600, and in some places or media, to about 1650
That overlap matters. It explains why some early Renaissance art still keeps older habits, and why “medieval versus Renaissance” can be trickier than a quiz chart suggests.
The Italian painting periods students should know
If your class focuses on Italy, one helpful framework divides Italian Renaissance painting into four periods, as outlined in the overview of Italian Renaissance painting:
- Proto-Renaissance: 1300–1425
- Early Renaissance: 1425–1495
- High Renaissance: 1495–1527
- Mannerism: 1527–1600
You don't need to memorize every art-historical label at first. But these ranges help you place artists and works in order.
Anchor dates that are worth memorizing
A few dates act like map pins. They make the whole period easier to remember.
- 1401–1402: Lorenzo Ghiberti won the Florence Baptistery door competition
- 1436: Brunelleschi completed the Florence cathedral dome
- 1490s through the 1520s: High Renaissance is usually placed here
- 1527: Sack of Rome, often treated as a major turning point
If you can place 476, 1401, 1436, and 1527 in order, you already have a strong timeline skeleton for tests and essays.
One more study tip helps. Tie dates to places. Florence matters early. Rome becomes important later. If you want broader support for the historical setting, Knobee's world history subject page can help you connect art to the larger era.
What Art Was For and Who Decided What Got Made
Students often compare middle ages and Renaissance art as if one era painted only religion and the other suddenly discovered ordinary life. The story is more interesting. The subjects widened, but religion remained central.
Museum-style teaching materials often push students to ask about context, intended audience, and daily life details, rather than memorizing a simple “religious versus secular” split, as emphasized in The Met's Renaissance educator resource.
Purpose came first
In the Middle Ages, much art served devotion and instruction. Churches and monasteries needed images that supported worship and taught stories to viewers. That did not mean artists lacked skill. It meant the image had a clear job.
In the Renaissance, that devotional role continued. But wealthy families, city governments, and courts also commissioned more portraits, mythological scenes, and works tied to civic identity or private display. The range expanded.
Purpose and Patronage Across the Two Eras
| Aspect | Middle Ages | Renaissance |
|---|---|---|
| Main function | Often devotional and instructional | Still often devotional, but also civic, portrait, and mythological |
| Common patrons | Churches, monasteries, religious institutions | Religious institutions, elites, courts, wealthy families, city leaders |
| Viewer experience | Often focused on spiritual meaning and reverence | Often combined spiritual meaning with observation, status, and human presence |
| Subject matter | Christian scenes and sacred figures were central | Christian scenes stayed central, while other subjects became more visible |
| What students should ask | “How did this guide belief or worship?” | “Who commissioned this, and what message did they want?” |
Patronage shaped artistic choices
Art costs time, labor, materials, and space. Someone had to pay for it. That means patronage matters.
A strong example is Lorenzo de' Medici (1449–1492), described as a major catalyst for art patronage in Florence who encouraged commissions from leading artists including Leonardo da Vinci, Sandro Botticelli, and Michelangelo Buonarroti in Lumen Learning's discussion of art and patronage.
When a church commissioned an altarpiece, the purpose shaped the result. When an elite family commissioned a portrait or decorative scene, their social goals shaped the result. Art was not made in a vacuum.
A painting is not just an image. It is also a response to a patron, a place, an audience, and a purpose.
Three questions to ask any artwork
When you study an image, try these:
- Who paid for it: A church, monastery, ruler, or wealthy family?
- Who was meant to see it: Public worshippers, private household viewers, or civic audiences?
- What was it supposed to do: Teach, inspire prayer, honor a person, show status, or celebrate a city?
Those questions work better than the old binary. They help you see continuity as well as change.
How Techniques Changed What Artists Could Show
Style is not just about taste. It's also about tools. If artists use different materials and different systems for showing space, the final image will look different.
That's why technique matters so much in middle ages and Renaissance art. Changes in paint and perspective gave artists new ways to solve old visual problems.
Egg tempera and oil paint solved different problems
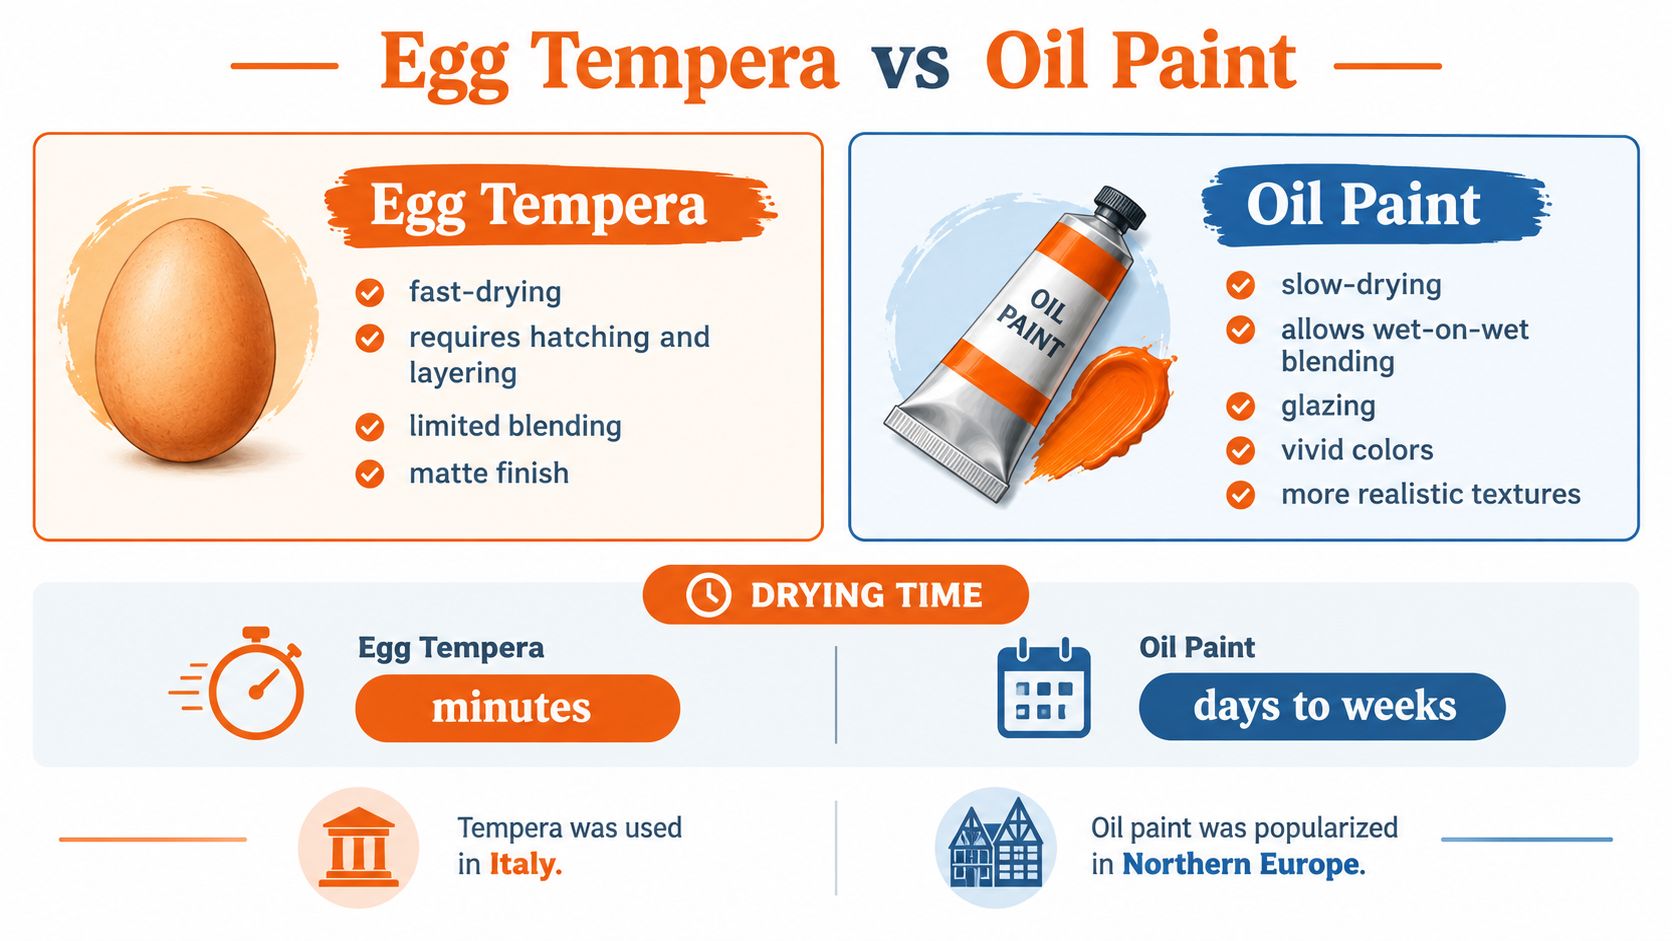
Before oil became dominant, many painters used egg tempera on panels. In egg tempera, pigment is mixed with egg yolk. It dries quickly. That sounds helpful, but it also limits how long an artist can blend edges or reshape shadows.
According to World History Encyclopedia's discussion of Renaissance art materials, egg tempera required fine hatching and layer-by-layer modeling, while oil paint dried slowly, could be reworked, and was often applied in transparent glazes that increased tonal range, depth, and realism.
A simple analogy helps. Egg tempera is a bit like working with a pen that dries fast. You need control and planning. Oil paint is more like a blendable paint set. You can soften transitions and build glowing layers over time.
Why oil changed the look of paintings
Oil paint made subtle light and shadow more practical. Artists could model flesh more softly. Fabrics could look heavier or shinier. Space could feel deeper.
That does not mean tempera was “bad” and oil was “good.” It means each medium had strengths. Tempera can look crisp and luminous. Oil gave artists more flexibility when they wanted gradual transitions.
- Fast drying: Tempera pushed artists toward careful layering
- Slow drying: Oil allowed reworking and blending
- Transparent glazes: Oil helped create depth and richer tonal effects
Perspective gave artists a spatial map
Another major breakthrough was linear perspective, often linked to Filippo Brunelleschi in the early 15th century. This system used geometry to project three-dimensional space onto a flat surface, as discussed in Kooschadler's history of egg tempera and Renaissance technique.
Perspective helped artists organize floors, walls, buildings, and figures so they fit together more coherently. Instead of placing objects wherever they symbolically belonged, artists could build a believable space.
Key idea: Perspective did not just make pictures look clever. It gave artists a repeatable method for making space make sense.
What science reveals inside a painting
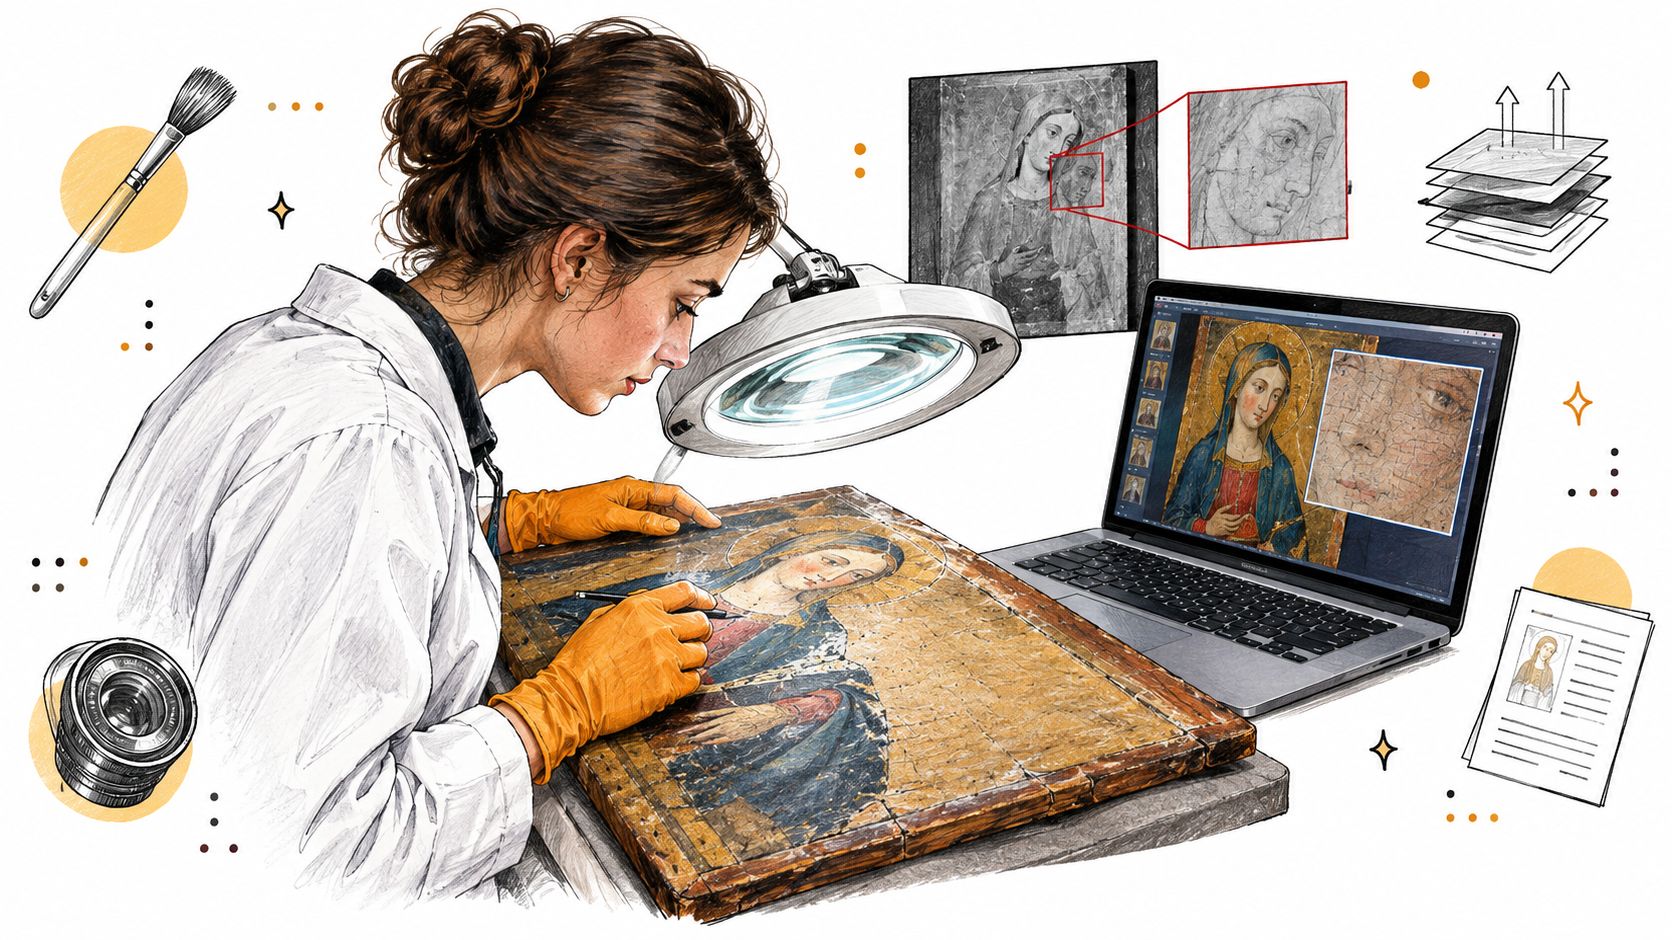
Technical studies also show that Renaissance workshop practice could include preparatory underdrawings, layered paint structures, and sometimes mixed-media workflows. Conservators now use methods such as XRF, Raman spectroscopy, microscopy, and infrared imaging to identify layers and reconstruct how artists built visual effects.
That matters for students because it turns style into evidence. When you see depth, glow, or careful planning, those effects often come from visible choices in materials and process.
Major Artists and Works That Mark the Transition
Dates become easier to remember when you tie them to people. Instead of memorizing a wall of names, connect each artist to one shift in how art was made or seen.
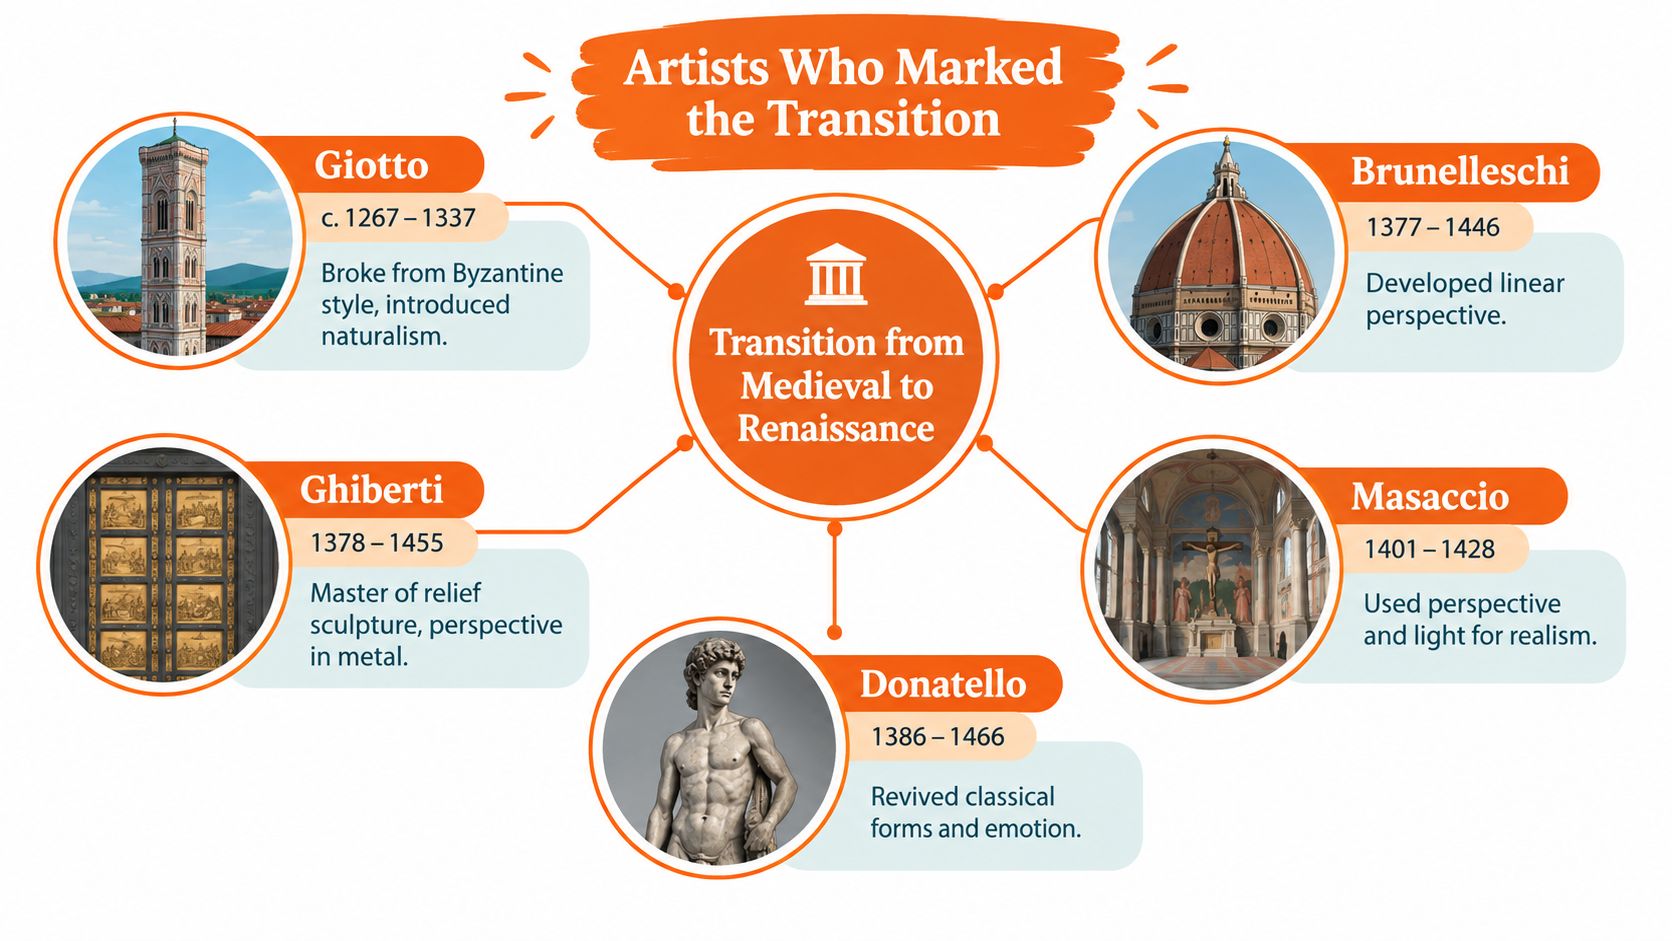
The Renaissance in Europe is commonly dated to the 14th, 15th, and 16th centuries, with the early phase in Italy often traced to the early 14th century, a major milestone at 1401–1402 when Lorenzo Ghiberti won the Florence Baptistery door competition, and the High Renaissance usually placed in the 1490s through the 1520s, as summarized in Britannica's Renaissance overview.
Early change did not start all at once
Many classes begin this story with Giotto, because he is often treated as an early break from more rigid medieval habits. Even when a textbook does not ask you to memorize all his dates, it helps to remember his role. He points toward greater solidity and human presence.
Then come artists and architects tied to Florence. Ghiberti's success in the 1401–1402 competition is one anchor. Brunelleschi's dome, completed in 1436, is another. These milestones show that the new artistic language matured quickly.
High Renaissance anchors students often see on tests
Two works come up again and again:
- Leonardo da Vinci's Mona Lisa, painted 1503–1506
- Michelangelo's Sistine Chapel ceiling, finished in 1512
These dates help you locate the High Renaissance. They also give you examples of the movement toward naturalism, spatial confidence, and classical revival.
A short video can help make those connections more visual:
A simple way to remember the transition
Try this chain:
- Giotto: early move toward more lifelike presence
- Ghiberti: early Renaissance milestone in Florence
- Brunelleschi: major architectural and spatial breakthrough
- Leonardo: refined observation and subtle naturalism
- Michelangelo: monumental human form and dramatic religious art
This sequence helps because it shows development, not just a list. The movement shifted from medieval forms toward perspective, naturalism, and classical revival, and those artists mark the path.
How We Know What We Know About These Artworks Today
Students are often asked, “What style is this?” A deeper question is better. How do historians know what they know about the artwork in the first place?
That question matters because paintings and objects change over time. Surfaces darken. Varnish ages. Damage gets repaired. Parts are repainted. Museums also change how they display and explain objects.
Conservation can change interpretation
Recent scholarship highlights an underserved angle in teaching. Instead of only asking what medieval or Renaissance art looks like, it helps to ask how conservation, digital imaging, and exhibition design reveal underdrawings, surface damage, or original color, as discussed in this University of Glasgow research on digital interpretation and late medieval objects.
That means art history is not just memorization. It is evidence-based interpretation. Conservators and researchers study layers, materials, wear, and display context to build better explanations.
We do not simply “see” the past. We reconstruct it from surviving objects, scientific analysis, and changing museum interpretation.
Digital access changes what students can study
Digital tools also matter. High-quality imaging can reveal details that classroom reproductions hide. Online collections let students zoom in on surfaces, compare objects side by side, and notice clues about audience, function, and damage.
That is especially useful for late medieval religious objects, where original viewing conditions were very different from modern museum display. A carved object once used in a devotional setting does not mean the same thing when placed behind glass with a label.
Better questions lead to better analysis
When you study an artwork, try moving past “Is it medieval or Renaissance?” Ask:
- What evidence survives: Original paint, later repairs, or visible underdrawing?
- How has restoration affected what I'm seeing: Brighter color, cleaner surface, new visibility of details?
- What was the original setting: Church, chapel, palace, street, or private room?
Those questions make you a stronger reader of images. They also guard against oversimplified answers.
Study Prompts and Next Steps to Remember the Difference
If you only memorize “flat versus realistic,” you'll forget it or use it badly. What sticks better is a short set of recall prompts you can answer from memory.
The strongest takeaway is this. Continuity matters as much as change. Religious art stayed important. Patronage shaped choices. Technique helped make new effects possible.
Try these active-recall prompts
Cover your notes and answer these out loud or on paper.
- Put the dates in order: 476 CE, 1401–1402, 1436, 1512
- Explain the overlap: Why didn't religious art disappear in the Renaissance?
- Name the tool: Which medium dried quickly and limited blending. Egg tempera or oil paint?
- Connect cause and effect: How did linear perspective change what artists could show?
- Spot the patron question: If a wealthy family paid for a work, how might that affect subject and style?
Use this quick artwork checklist
When a teacher gives you an unfamiliar image, run through this list:
- Time clue: Does the date place it in the Middle Ages, Proto-Renaissance, Early Renaissance, or High Renaissance?
- Function clue: Was it made for devotion, teaching, civic pride, or private display?
- Material clue: Does it look carefully layered and crisp, or softly blended?
- Space clue: Is the setting symbolic, or does it use a more geometric sense of depth?
- Audience clue: Who was meant to stand in front of it?
Study shortcut: If you can explain purpose, patron, and technique, you usually won't need to guess the era blindly.
A simple review routine that works
Try this over a few short sessions instead of one long cram:
- Make a mini timeline from memory.
- Sort artworks into “likely medieval,” “likely transitional,” and “likely Renaissance.”
- Write one sentence on what stayed the same.
- Write one sentence on what changed.
If you want to turn class notes into something easier to quiz yourself with, tools that create practice from your own materials can help. For example, you can generate flashcards from notes and then test whether you can explain the difference without staring at the answer first.
Knobee AI can turn your history notes, class slides, or reading excerpts into Study Sets with flashcards, quizzes, and short Daily Boost review sessions. If you're studying middle ages and Renaissance art, it can also help you practice timeline order, patronage questions, and technique comparisons with guided support from Kno instead of just giving you finished answers. Visit Knobee AI to start practicing from your own course materials.